Installation
The kapa website widget can be installed on all websites that allow you to inject a JavaScript script. See below for installation instructions for a common list of destinations. However, note that this list is not exhaustive.
Basic Website Installation
This method works on most websites and documentation hosting providers.
Paste the following script tag into the <head> tag of your website:
<script async
src="https://widget.kapa.ai/kapa-widget.bundle.js"
data-website-id="XXX-XXX-XXX"
data-project-name="PROJECT_NAME"
data-project-color="#HEX_COLOR_CODE"
data-project-logo="https://LINK_TO_LOGO.com/logo.png"
></script>
Docusaurus
Paste the following script tag into the <docusaurus.config.js> configuration file. Set async: true to ensure the script tag loads properly.
// docusaurus.config.js
const config =
{
  scripts: [
    {
          src: "https://widget.kapa.ai/kapa-widget.bundle.js",
          "data-website-id": "XXX-XXX-XXX",
          "data-project-name": "PROJECT_NAME",
          "data-project-color": "#HEX_COLOR_CODE",
          "data-project-logo":
            "https://LINK_TO_LOGO.com/logo.png",
          async: true,
        },
  ]
}
MKDocs
To install the kapa.ai website widget in MKDocs, follow these steps:
- Locate your
mkdocs.ymlconfiguration file. - Add the following code to the
extra_javascriptsection of themkdocs.ymlfile:
extra_javascript:
  - "javascript/init_kapa_widget.js"
Create a new JavaScript file named
init_kapa_widget.jsin thedocs/javascriptfolder.Add the following code to the
init_kapa_widget.jsfile, replacing the placeholders with your specific project parameters:
document.addEventListener("DOMContentLoaded", function () {
  var script = document.createElement("script");
  script.src = "https://widget.kapa.ai/kapa-widget.bundle.js";
  script.setAttribute("data-website-id", "XXX-XXX-XXX");
  script.setAttribute("data-project-name", "PROJECT_NAME");
  script.setAttribute("data-project-color", "#HEX_COLOR_CODE");
  script.setAttribute("data-project-logo", "https://LINK_TO_LOGO.com/logo.png");
  script.async = true;
  document.head.appendChild(script);
});
- Save the changes to both files and rebuild your MKDocs project. The kapa.ai website widget should now be installed and visible on your documentation pages.
Discourse Forums
To install the kapa.ai website widget in Discourse, follow these steps:
Access Discourse Admin Panel:
- Log in to your Discourse forum as an administrator.
- Click on the hamburger menu (three horizontal lines) in the top right corner and select Admin from the dropdown.
Navigate to Customize Section:
- In the admin dashboard, click on the Customize tab.
- Then, select the Themes option on the left sidebar.
Edit Active Theme:
- Find the active theme you're currently using (it'll typically have a green checkmark next to it).
- Click on the theme name to open its settings.
Add the Widget Script:
- Click on the Edit CSS/HTML button.
- Select the
</head>tab. This allows you to add scripts that load in the head section of your forum. - Paste the provided script tag at the bottom of the content:
<script
  defer
  src="https://widget.kapa.ai/kapa-widget.bundle.js"
  data-website-id="YOUR_WEBSITE_ID"
  data-project-name="YOUR_PROJECT_NAME"
  data-project-color="YOUR_HEX_COLOR_CODE"
  data-project-logo="YOUR_LOGO_LINK"
></script>
Adjust Content Security Policy:
- To ensure ReCaptcha loads properly, you'll need to adjust the content security policy (CSP) settings.
- Return to the main Admin dashboard.
- Click on the Settings tab.
- In the filter box, type "Content Security Policy" to narrow down the settings related to CSP.
- Find the setting named
content_security_policy_script_src. - Add
https://www.google.comandhttps://www.gstatic.comto the list. Ensure you separate each entry with a space. - Click the green checkmark or save button next to the setting to apply the changes.
Test the Widget:
- Refresh your Discourse forum and ensure the widget loads properly without any CSP errors.
ReadTheDocs
Create a Custom JavaScript File:
- In your Sphinx project directory, navigate to or create the
_staticdirectory. - Create a new file named
custom.jsin the_staticdirectory. - Add the following code to the
custom.jsfile:Replacedocument.addEventListener("DOMContentLoaded", function () {
var script = document.createElement("script");
script.src = "https://widget.kapa.ai/kapa-widget.bundle.js";
script.setAttribute("data-website-id", "XXX-XXX-XXX");
script.setAttribute("data-project-name", "PROJECT_NAME");
script.setAttribute("data-project-color", "#HEX_COLOR_CODE");
script.setAttribute(
"data-project-logo",
"https://LINK_TO_LOGO.com/logo.png"
);
script.async = true;
document.head.appendChild(script);
});XXX-XXX-XXX,PROJECT_NAME,#HEX_COLOR_CODE, andhttps://LINK_TO_LOGO.com/logo.pngwith your specific project parameters.
- In your Sphinx project directory, navigate to or create the
Create a Custom CSS File:
In some Sphix setups overriding the CSS is necessary to ensure the widget appears correctly.
In the same
_staticdirectory, create a new file namedcustom.css.Add the following CSS to the
custom.cssfile to ensure correct widget positioning:#kapa-widget-container {
z-index: 10000 !important;
position: absolute !important;
}
.mantine-Modal-root {
z-index: 10000;
position: absolute;
}
Modify the
conf.pyFile:- Locate the
conf.pyfile in your Sphinx project directory. - Add the following options to your Sphinx configuration:
html_static_path = ["_static"]
html_js_files = ["custom.js"]
html_css_files = ["custom.css"]
This will include the
custom.jsandcustom.cssfiles in the build output.- Locate the
Commit and Push the Changes:
- Commit and push the changes to your repository.
- ReadTheDocs should automatically detect the change and rebuild your documentation. If it does not, you can manually trigger a build from your ReadTheDocs project dashboard.
Zendesk Knowledge Base
Zendesk Guide, the platform for Zendesk's knowledge base, allows you to customize the look and feel of your help center using themes. To add custom JavaScript, you'll typically need to modify the theme.
Follow these steps to add the widget to your Zendesk Guide:
Access Zendesk Guide Theme Editor:
- From your Zendesk dashboard, navigate to Guide Admin.
- Click on the Customize design tab.
- Choose the theme you're using (or want to modify) and click Edit Code.
Add the Widget Script:
- In the theme code editor, find the file named document_head.hbs. This is where you'll add the script to ensure it loads on every page of your knowledge base.
- Paste the provided script tag at the bottom of this file:
<script
  src="https://widget.kapa.ai/kapa-widget.bundle.js"
  data-website-id="XXX-XXX-XXX"
  data-project-name="PROJECT_NAME"
  data-project-color="#HEX_COLOR_CODE"
  data-project-logo="https://LINK_TO_LOGO.com/logo.png"
></script>
Save & Preview:
- Click Save.
- Preview your help center to ensure the widget loads properly.
Publish Changes:
- Once you're satisfied with the preview, click Publish to make your changes live.
Note: Always backup your theme before making changes. This ensures that you can revert back to a previous version if something goes wrong.
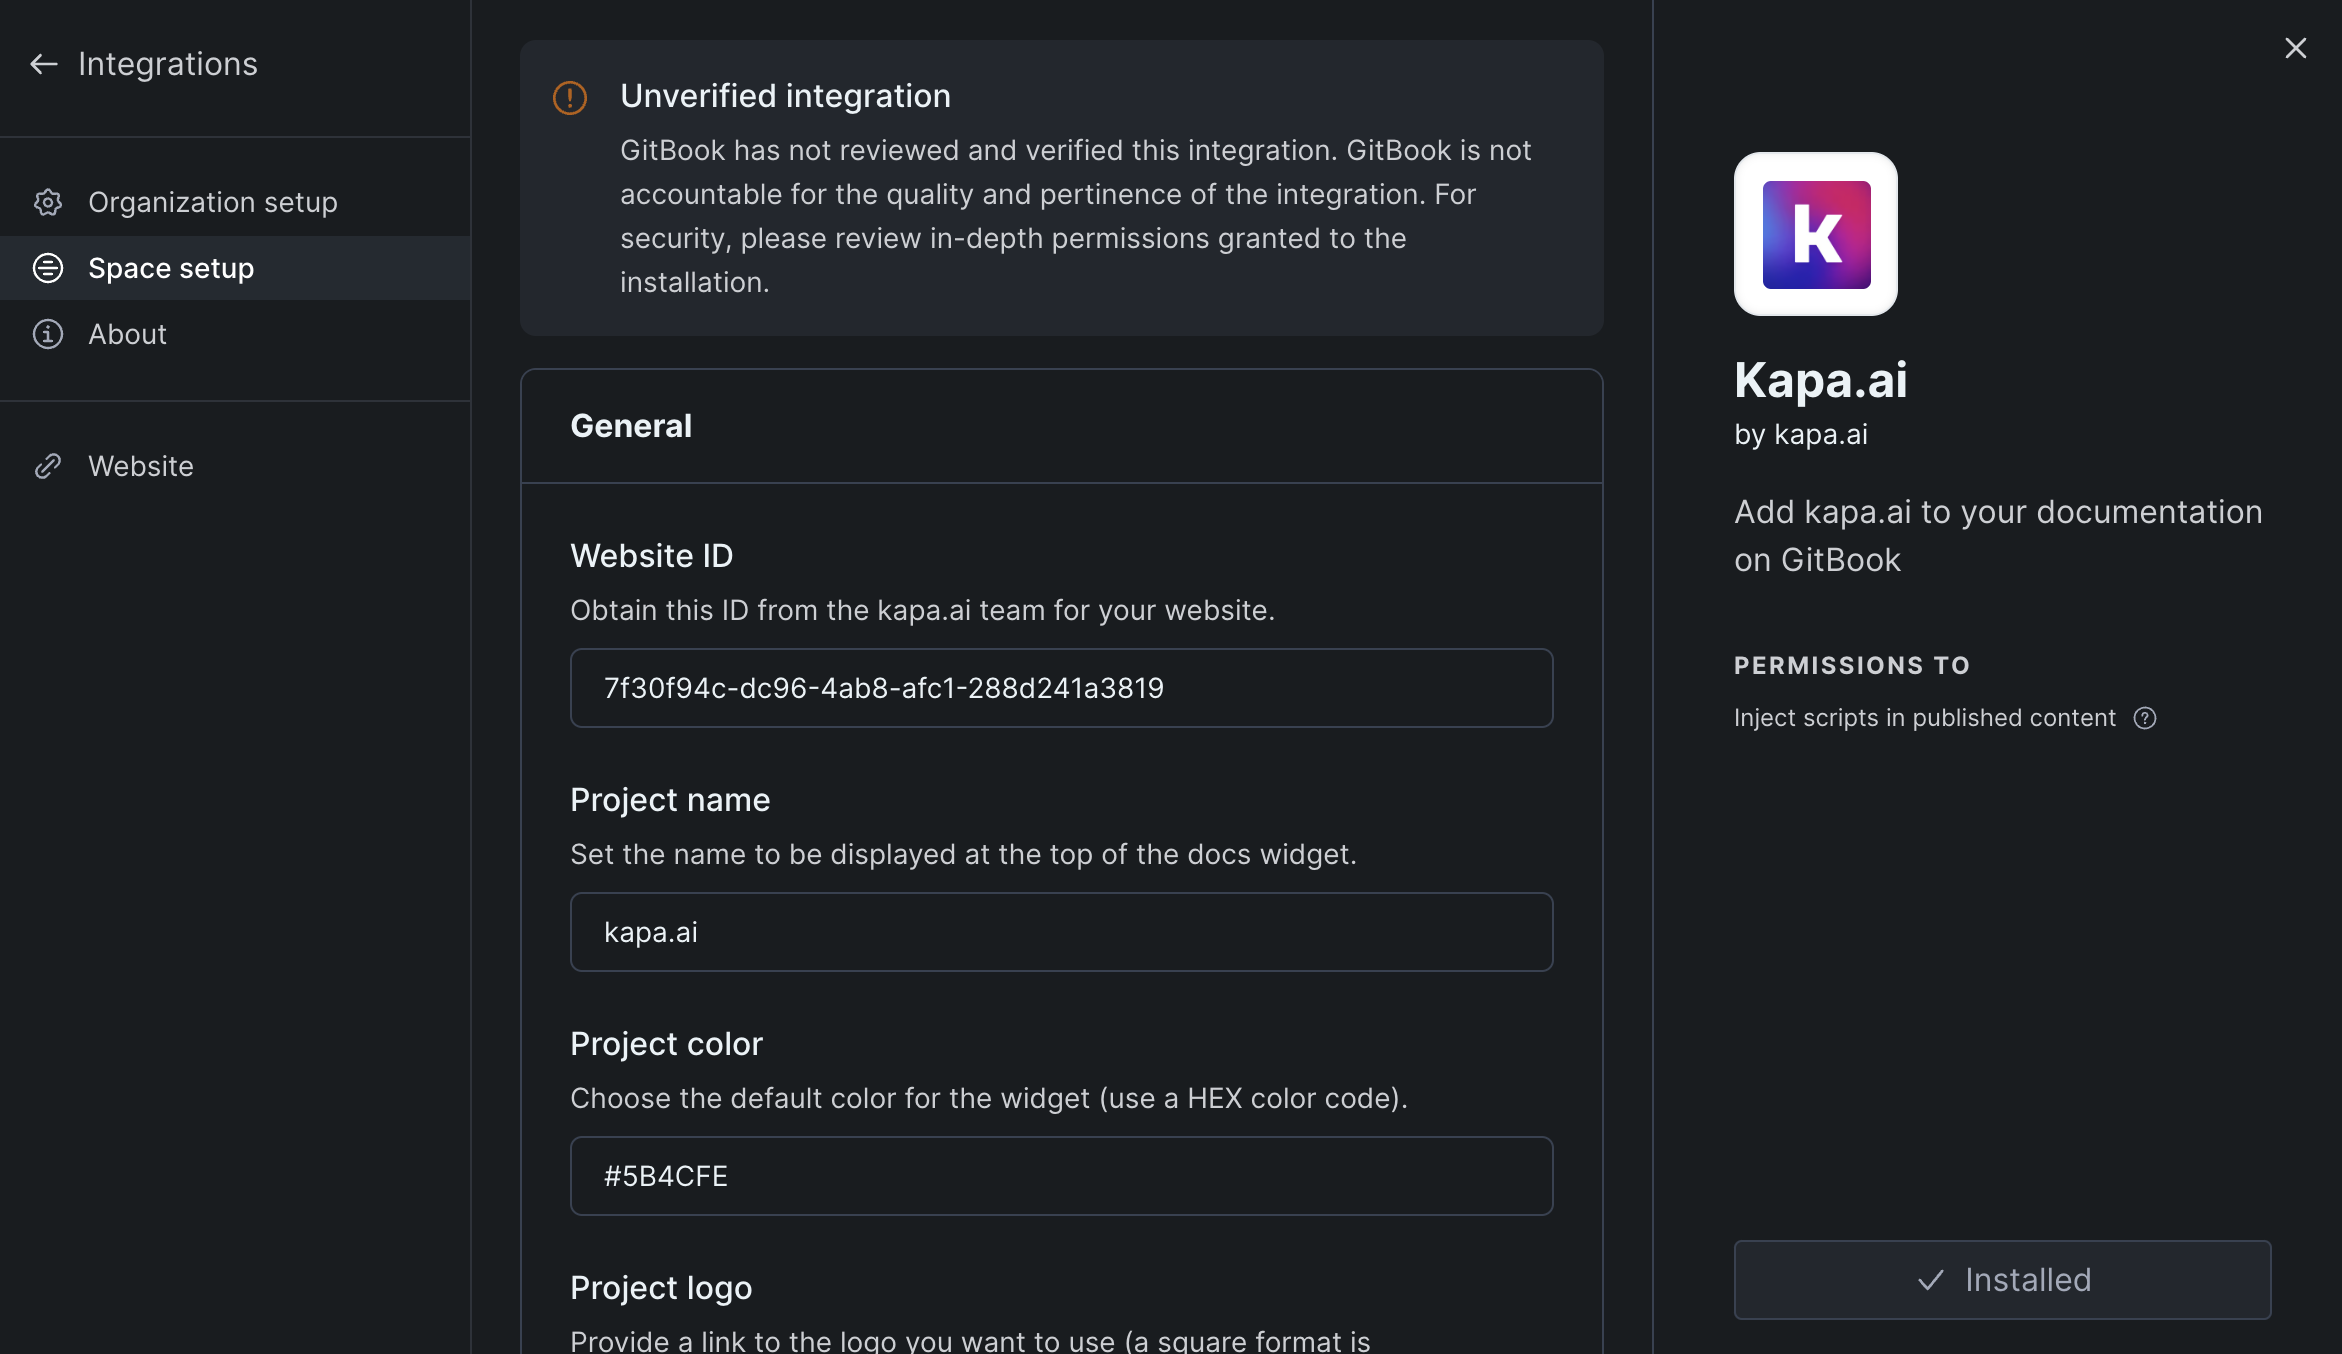
GitBook
To install the kapa.ai website widget on GitBook use the kapa.ai plugin for GitBook:
- Install the Kapa.ai GitBook plugin in your GitBook space.
- Use the GitBook UI to configure the plugin with your project parameters. You can configure all parameters described in Step 1.
- It might be necessary to trigger a rebuild of the GitBook space to ensure that changes to the Kapa integration configuration are applied. You can do this by publishing an arbitrary change request.
- The kapa.ai website widget should now be installed and visible on your documentation pages.
Sphinx
To install the kapa.ai website widget in Sphinx, follow these steps:
Create a Custom JavaScript File:
- In your Sphinx project directory, navigate to or create the
_staticdirectory. - Create a new file named
custom.jsin the_staticdirectory. - Add the following code to the
custom.jsfile:Replacedocument.addEventListener("DOMContentLoaded", function () {
var script = document.createElement("script");
script.src = "https://widget.kapa.ai/kapa-widget.bundle.js";
script.setAttribute("data-website-id", "XXX-XXX-XXX");
script.setAttribute("data-project-name", "PROJECT_NAME");
script.setAttribute("data-project-color", "#HEX_COLOR_CODE");
script.setAttribute(
"data-project-logo",
"https://LINK_TO_LOGO.com/logo.png"
);
script.async = true;
document.head.appendChild(script);
});XXX-XXX-XXX,PROJECT_NAME,#HEX_COLOR_CODE, andhttps://LINK_TO_LOGO.com/logo.pngwith your specific project parameters.
- In your Sphinx project directory, navigate to or create the
Create a Custom CSS File:
In some Sphix setups overriding the CSS is necessary to ensure the widget appears correctly.
In the same
_staticdirectory, create a new file namedcustom.css.Add the following CSS to the
custom.cssfile to ensure correct widget positioning:#kapa-widget-container {
z-index: 10000 !important;
position: absolute !important;
}
.mantine-Modal-root {
z-index: 10000;
position: absolute;
}
Modify the
conf.pyFile:- Locate the
conf.pyfile in your Sphinx project directory. - Add the following options to your Sphinx configuration:This will include the
html_static_path = ["_static"]
html_js_files = ["custom.js"]
html_css_files = ["custom.css"]custom.jsandcustom.cssfiles in the build output.
- Locate the
Commit and Push the Changes:
- Commit and push the changes to your repository.
Freshdesk Integration
To integrate the kapa.ai website widget with Freshdesk, follow these steps:
Access Freshdesk Admin Panel:
- Log in to your Freshdesk account as an administrator.
- Navigate to the Admin tab.
Add the Widget Script:
- In the Admin panel, go to Portals > Settings.
- Select the portal where you want to add the widget.
- Click on Edit Portal and navigate to the Custom Scripts section.
- Paste the following script in the Footer section:
Salesforce Service Cloud
To install the kapa.ai website widget in Salesforce Service Cloud, follow these steps:
Access Salesforce Service Cloud Setup:
- Log in to your Salesforce Service Cloud account as an administrator.
- Navigate to the Setup section by clicking on the gear icon in the top right corner.
Create a New Lightning Component:
- In the Setup menu, search for Lightning Components and select Lightning Components under Custom Code.
- Click on New to create a new Lightning Component.
- Name your component (e.g.,
KapaWidgetComponent) and click Save.
Add the Widget Script to the Lightning Component:
- In the Lightning Component editor, add the following code to include the kapa.ai widget script:Replace
<aura:component>
  <ltng:require
    scripts="{!$Resource.kapaWidget}"
    afterScriptsLoaded="{!c.doInit}"
  />
  <script>
    document.addEventListener("DOMContentLoaded", function () {
      var script = document.createElement("script");
      script.src = "https://widget.kapa.ai/kapa-widget.bundle.js";
      script.setAttribute("data-website-id", "YOUR_WEBSITE_ID");
      script.setAttribute("data-project-name", "YOUR_PROJECT_NAME");
      script.setAttribute("data-project-color", "YOUR_HEX_COLOR_CODE");
      script.setAttribute("data-project-logo", "YOUR_LOGO_LINK");
      script.async = true;
      document.head.appendChild(script);
    });
  </script>
</aura:component>YOUR_WEBSITE_ID,YOUR_PROJECT_NAME,YOUR_HEX_COLOR_CODE, andYOUR_LOGO_LINKwith your specific project parameters.
- In the Lightning Component editor, add the following code to include the kapa.ai widget script:
Add the Lightning Component to a Page:
- Navigate to the App Builder by searching for App Builder in the Setup menu.
- Select the page where you want to add the widget (e.g., Home Page or Record Page).
- Click on Edit next to the page name.
- Drag and drop the newly created
KapaWidgetComponentonto the desired section of the page. - Click Save and then Activate to make the changes live.
Test the Widget:
- Navigate to the page where you added the widget to ensure it loads correctly and functions as expected.
By following these steps, you will successfully integrate the kapa.ai website widget into your Salesforce Service Cloud environment.