Slack Bot
Kapa can be deployed as a bot to your Slack to answer questions either in channels or by direct messaging the bot 1-to-1. This helps with three main use cases:
- Community help: Deploy Kapa in your community Slack so end-users can get answers to product questions on their own.
- Internal teams: Deploy Kapa in internal channels or via DM so employees can query internal documentation, processes, and knowledge without waiting on colleagues.
- Customer support channels: Deploy Kapa in shared channels with your customers. Customers can self-serve answers directly, or your support team can tag Kapa into conversations where it knows the answer to lighten their workload.
Check out the example deployments to see examples of how companies like Airbyte and Mixpanel use the Kapa Slack bot to automatically answer questions in their customer communities.
Integration types
You have two options for deploying Kapa in Slack:
- Global Workspace: Enable Kapa in an entire Slack workspace.
- Single Channel: Enable Kapa in a single Slack channel at a time.
The Global Workspace integration lets you chat with Kapa in any channel you invite the Slack bot to. It also lets you send direct messages (DMs) to the bot for private conversations.
When using the Global Workspace integration, be cautious with shared channels. Adding the Kapa bot to a shared channel allows all members of that channel, including external users, to interact with the bot and access connected data sources. This is especially important for Slack integrations connected to internal projects.
With a Single Channel integration, Kapa can only respond in specific channels. You can create multiple Single Channel integrations and enable them individually to deploy Kapa to multiple channels without enabling it for an entire workspace.
Using both integration types
You can use both integration types in the same workspace. Single Channel integrations take priority over Global Workspace integrations if both exist. This means you can have a default configuration for all channels while using different settings in specific channels.
Setup
The following steps are required to deploy Kapa to your Slack workspace:
- Create a dedicated Slack channel for Kapa (Optional)
- Create a Slack integration in the Kapa platforn
- Configure your Slack integration
- Install the Kapa slack bot to your Slack
- Invite the Kapa slack bot to your desired channels
- Enable Kapa from your Slack workspace with a bot command
1. Create a new Slack channel (optional)
We recommend creating a dedicated channel for Kapa. Avoid adding Kapa to an existing help channel to keep interactions clear. Users should be able to distinguish between channels where they can expect human responses and those where Kapa provides answers. We suggest naming this channel #ask-ai to help users easily identify its purpose.
If you are deploying Kapa internally for your teams, this is less relevant. However, we still recommend that the channel where Kapa is deployed is easily discoverable.
See here for some real communities where Kapa is installed in a dedicated channel.
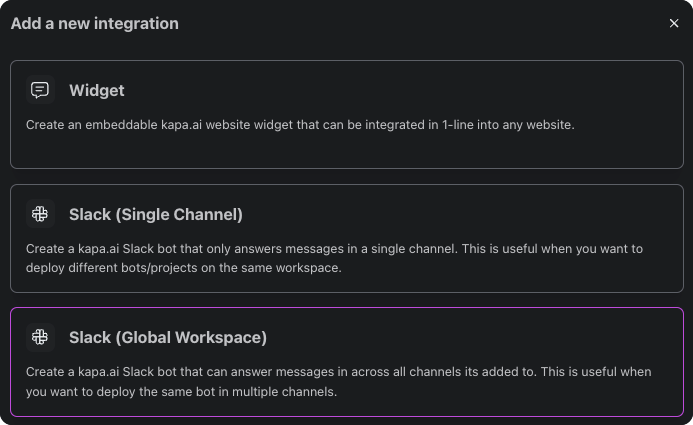
2. Create a Slack integration
Navigate to the Integrations tab in the Kapa platform and create a new Slack integration. Choose whether you want a single-channel or global workspace deployment (see Integration types).
3. Configure your integration
The Slack integrations have various configuration options. The mandatory configuration options are:
-
Workspace ID: The unique identifier of your Slack workspace. You can find this in the URL when you are logged into Slack in your browser. The workspace ID is the string of characters that comes after
/client/in the URL. For example, if your Slack URL ishttps://app.slack.com/client/T1A2B3CDF/CXXXXXXX, then your workspace ID isT1A2B3CDF. If you are using the Slack desktop app, you will need to open Slack in your browser to find the workspace ID. TheWorkspace IDis required by bothSlack (Single Channel)andSlack (Global Workspace).noteIf your organization has a Slack Enterprise subscription, you can find the org ID the same way as the workspace ID (in your browser URL after
/client/), but it starts withEinstead ofT. -
Channel ID: The unique identifier of the Slack channel where you want to deploy Kapa. You can find it by right-clicking on the channel name in Slack and selecting
Copy link. The channel ID is the string of characters that comes after/archives/in the URL. For example, if the channel URL ishttps://yourteam.slack.com/archives/C1A2B3CDF, then the channel ID isC1A2B3CDF. TheChannel IDis only required bySlack (Single Channel).
The advanced configuration lets you further customize the Slack integration. These settings are optional and can be modified at any time.
Forum auto-reply mode
The option Enable forum auto-reply mode controls whether Kapa automatically responds to new posts in the Slack channels that you've invited the bot to.
- If left unchecked (default), users must tag Kapa to generate a reply.
- If this option is checked, Kapa automatically replies to all new posts.
Forum auto-reply mode is not recommended for Global Workspace integrations.
User tracking
The Slack bot automatically tracks questions so you can see usage patterns and help users more effectively.
- Anonymous tracking (default): Uses Slack IDs to count unique users and track their question history
- Named tracking (optional): Collect email addresses to identify users by name, which helps consolidate their questions if you're running Kapa across multiple Slack workspaces or other platforms
Messages and feedback
Customize the messages Kapa sends to users throughout the conversation flow, including acknowledgment messages, follow-ups, and error handling. You can also control whether Kapa asks users for feedback after providing answers. This lets you match Kapa's tone and interaction style to your team's preferences.
Use Slack formatting to make responses more engaging. For more details, check the Formatting Tips on the configuration screen.
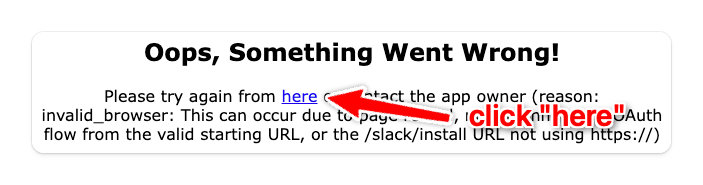
4. Install Kapa Slack bot to your workspace
Install the Kapa Slack bot from this link to your server: Slack Bot Install Link
Note that on some browsers, you may get the following error. If so, click the "here" link to get redirected to the correct page.
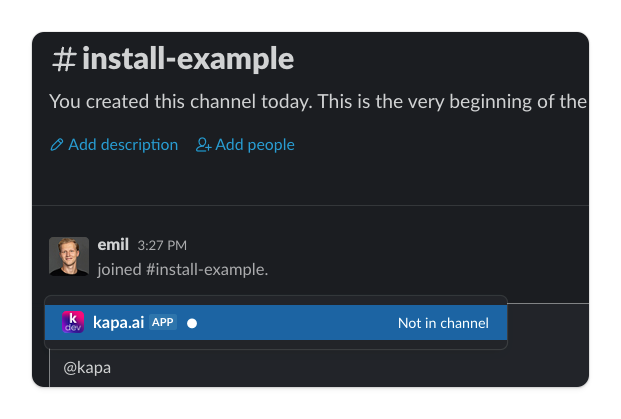
5. Invite Kapa Slack bot to channels
You need to invite the Kapa Slack bot to all channels where you want it to be able to respond to user questions. The easiest way to do this is to type @kapa.ai to mention the bot, then click the Add to Channel button. Be sure to only invite Kapa to channels that you have also configured in Step 3. If you are using Slack (Global Workspace) you can of course invite it to any channels or start direct messages with the bot.
6. Enable Kapa Slack bot via command
The final step is to enable the bot in your Slack workspace using slash commands. This confirms to the Kapa platform that you have the necessary authority over the Slack channels where you want Kapa to respond.
To run these commands, you must be a Workspace Owner or Workspace Admin of your Slack workspace.
-
To enable a Single Channel integration, open the Slack channel where you want the bot to respond and run the following command:
/kapa-enable-channel <integration_id> -
To enable a Global Workspace integration, run the following command once from any channel where the bot has been invited to enable the bot across the entire workspace:
/kapa-enable-workspace <integration_id>With a Global Workspace integration, you do not need to run
/kapa-enable-channelfor individual channels. The bot will respond in any channel it has been invited to (see Step 5).
The <integration_id> is the ID of the integration you created in the Kapa app. You can find it by clicking the Copy Integration ID button in the integrations table. Enter the command in the message box and press Enter. The bot will confirm once the integration is successfully enabled.

After the confirmation message appears in Slack and the Kapa platform shows the integration status as "Enabled", your bot is ready to receive questions.
7. Start Using Kapa
Kapa bot is now ready to help! You can interact with Kapa in the following ways:
- Direct Messages: DM Kapa for one-on-one assistance. It will respond in a thread to keep conversations organized. This requires a global workspace installation.
- Channels: In channels where Kapa is installed, you can ask Kapa a question by either mentioning it with
@kapaor simply typing your question, depending on the configuration you set up in the Kapa platform. - Tag Kapa in existing threads: You can mention
@kapain any existing thread to bring Kapa into the conversation. Kapa will automatically read the prior messages in the thread for context and provide an answer that takes the full conversation into account. This is useful when a discussion is already happening and you want Kapa to weigh in without starting a new thread.
For the best experience:
- Start a new thread if switching topics, as Kapa is optimized for staying on-topic.
- Ask follow-up questions or provide more context if you need clarification.
- Tag Kapa in an existing thread when you want it to consider the full conversation context.
FAQ
Can I rename the bot?
Yes, to rename the @kapa.ai Slack bot to something else:
- Open the kapa.ai app on Slack marketplace.
- Open the Configuration tab.
- Scroll down to the section called Bot User and click Edit
- Edit your custom name and save your changes.
Note that it is not possible to change the logo or description of the app, only the name/handle.
Can I control which Kapa project I DM directly?
No, if you have multiple projects, Kapa can only be directly messaged with a global workspace installation. If you have multiple Kapa bots installed in your workspace, you won't be able to choose which one to DM - it will always be the global workspace bot. To request this feature, please reach out to the Kapa team.
Do I ever need to update my Slack bot installation?
When we release new features that require additional permissions, you need to reinstall the bot to grant the new permissions. These updates are always backwards compatible. Your existing setup continues to work, but the new features won't be available until you reinstall. The Kapa team will inform you whenever such a change is released.
To reinstall, simply follow the installation link in Step 4. Your existing configuration and enabled channels are preserved. You do not need to re-enable the bot, add it to channels again, or reconfigure anything.
I can't use the /kapa-enable-channel or /kapa-enable-workspace commands
If the bot commands aren't visible in your workspace, you may need to update the bot. Reinstall the bot by following the steps in Section 2.
If the commands appear but don't function, it's likely that you don't have the necessary permissions. To enable the Slack bot, you must be a Workspace Owner or Workspace Admin.
How do I remove the Kapa Slack bot from a channel?
To remove the bot from a channel:
- Open the Slack channel you want to remove the bot from.
- Type
/kick @kapa.aiand hit send. - In the confirmation prompt, click Remove.
If the bot was created as a Single Channel integration, also delete the integration on the Kapa dashboard:
- Go to the Kapa platform and open the Integrations tab.
- Locate the Slack integration you want to remove in the list.
- Open the action menu and select Delete.
The Slack bot isn't responding to direct messages
If you recently migrated to a Slack Enterprise+ plan, you'll need to update
your integration settings. Enterprise Grid organizations use org IDs instead of
workspace IDs. Update your Kapa integration with your org ID (starts with E
instead of T) - you can find it the same way as the workspace ID in your
browser URL after /client/.
What permissions does the Slack bot require?
The Kapa Slack bot requires the following OAuth scopes during the installation process. These permissions are necessary for the bot to function correctly in your workspace.
| Permission | Description | Used For |
|---|---|---|
| app_mentions:read | Read @mentions of the bot | Detecting when users mention the bot to ask questions |
| assistant:write | Allows app to act as an App Agent | Displaying AI assistant animations for improved UX |
| users:read | Read basic user information | Identifying users who interact with the bot |
| users:read.email | Read user email addresses | User tracking across multiple integrations (when enabled) |
| chat:write | Send messages and ephemeral responses | Posting answers, acknowledgments, and feedback prompts |
| channels:history | Read message history in public channels | Reading conversation context to provide relevant answers |
| channels:join | Join public channels | Allowing the bot to be added to channels |
| channels:read | Read public channel information | Listing and reading channel metadata |
| groups:history | Read message history in private channels | Reading conversation context in private channels |
| im:history | Read direct message history | Supporting 1-on-1 conversations with the bot |
| mpim:history | Read multi-person DM history | Reading context in group DM conversations |
| commands | Register slash commands | Enabling /kapa-enable-channel and /kapa-enable-workspace commands |
| files:read | Download and read file contents | Processing files uploaded by users in their questions |
| reactions:read | Read emoji reactions | Tracking user feedback (upvotes/downvotes) on bot responses |
| reactions:write | Add emoji reactions | Rendering loading animations while the bot processes questions |
Can permissions be modified?
No, it is not possible to modify the permissions that the Kapa Slack bot requires. All listed permissions are necessary for the bot to provide its full functionality.
Can I attach files and images to my questions?
Yes, you can upload files along with your questions to provide additional context. Simply attach the file to your message when asking Kapa a question by clicking the + button in the message composer or by dragging and dropping the file into the chat.
Kapa considers the uploaded content as part of your question and uses it as additional context when formulating its response. See the full list of supported file types.