Embed an AI assistant in your app that answers questions and takes actions
In this tutorial, you run and take apart an assistant that lives inside a web application and does two kinds of work: it answers questions about the product from your documentation, and it takes actions on the user's behalf, asking for approval before it changes anything. The agent is built with the Vercel AI SDK; Kapa is the knowledge layer, one retrieval tool that searches your public documentation and everything else your project indexes. If you would rather not build the agent and chat UI yourself, the Kapa Agent SDK provides both out of the box.
The demo application is a small Next.js app: a workspace settings page for a fictional product called Acme, with the assistant in a panel beside it. The complete, runnable code lives in kapa-examples/in-product-agent.
By the end of this tutorial, you will have:
- The demo application running locally, with an assistant panel next to a workspace settings page.
- An assistant that answers product questions from your indexed documentation and changes the workspace behind an in-chat approval prompt.
- An understanding of the AI SDK pieces involved: tools, the agent loop, and the message stream the chat UI renders.
- A clear picture of what to replace to embed the same assistant in your own product.
Before you start
You need:
- A Kapa project with your documentation indexed. If you do not have one yet, Index your first source walks you through crawling a documentation site, with no code involved.
- An Anthropic API key for the model. The AI SDK is provider-agnostic, so you can swap in any other provider by changing one line; the tutorial notes where.
- Node.js 22 or later.
Create the Kapa credentials
The assistant calls Kapa's Retrieval endpoint server-side, which needs three values:
- Project ID: the unique identifier of your Kapa project. Go to Settings > Projects and copy it from the table.
- Integration ID: navigate to Integrations (under Deploy in the sidebar), click Add new integration, choose HTTP API, and copy the new integration's ID. The Retrieval endpoint works without one, but passing it marks the queries as this assistant's traffic, so you can tell it apart from everything else that queries your project.
- API key: navigate to API Keys (under Deploy in the sidebar), click Add new API key, and copy the key.
Keep the three values at hand for the next step, together with your Anthropic API key.
Run the app
-
Clone the examples repository, enter the example, and install the dependencies:
git clone https://github.com/kapa-ai/kapa-examples.gitcd kapa-examples/in-product-agentnpm install -
Create
.env.localfrom the template and fill in the values:.env.localANTHROPIC_API_KEY=<your Anthropic API key>KAPA_PROJECT_ID=<your project ID>KAPA_INTEGRATION_ID=<your integration ID>KAPA_API_KEY=<your Kapa API key> -
Start the development server and open http://localhost:3000:
npm run dev
You see an app shell: a sidebar with the two settings sections, the active section's table in the middle, and the assistant panel on the right.
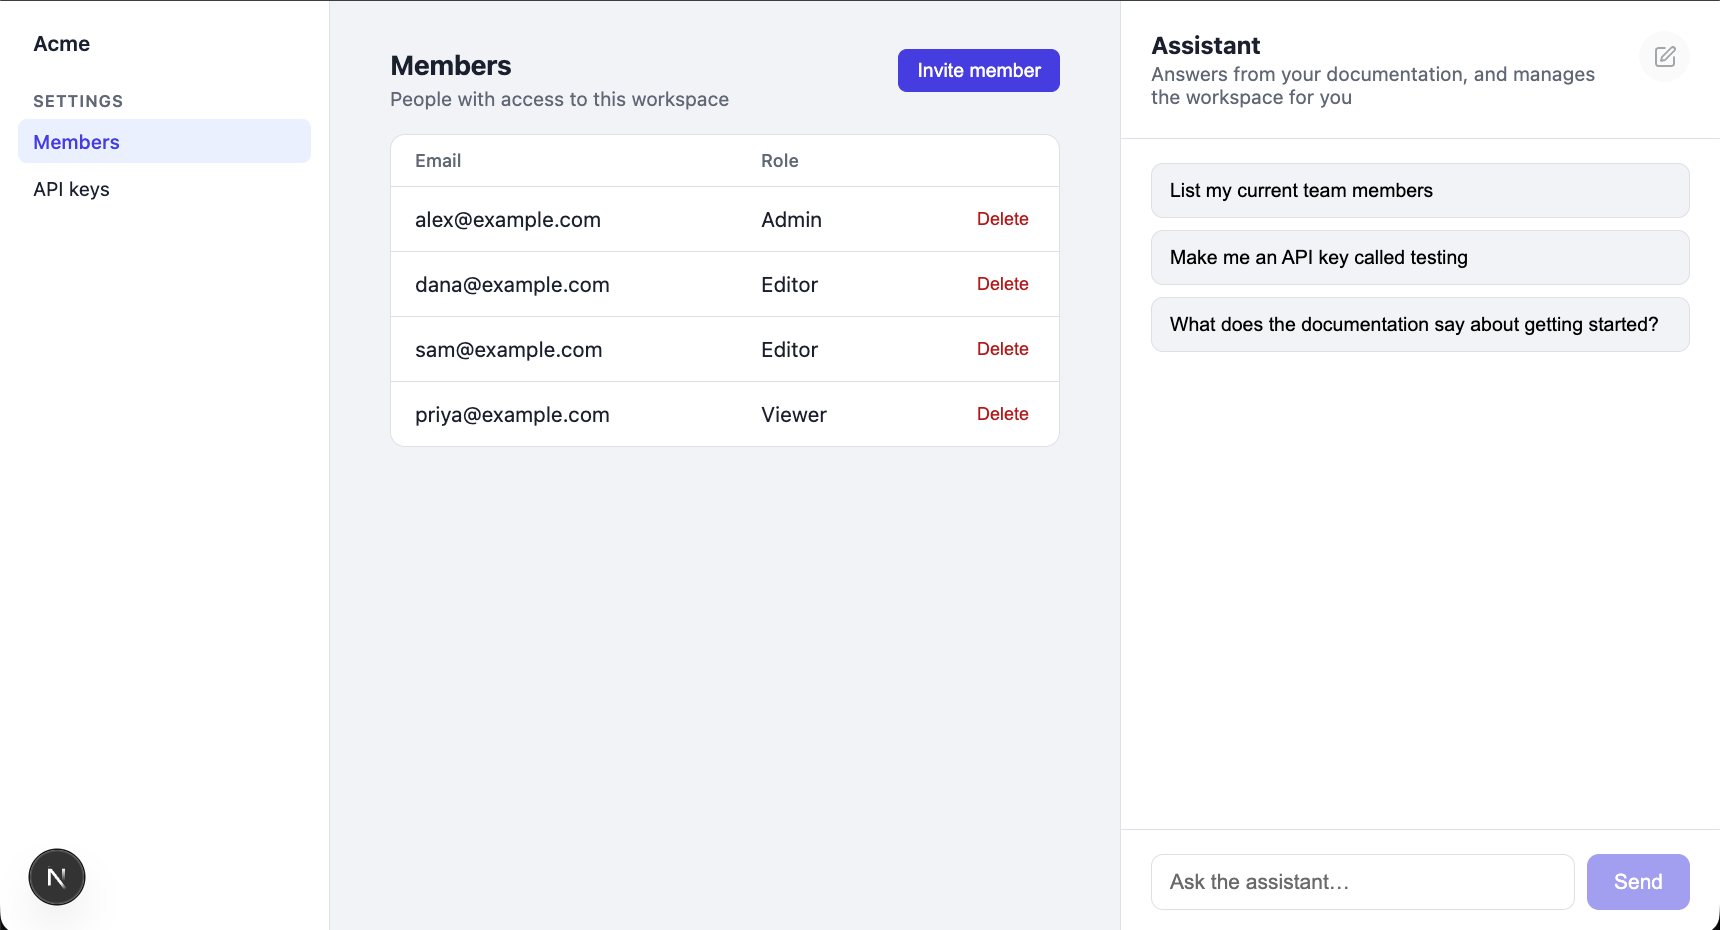
Acme is a fictional product, and this is its workspace settings page: a members table and an API keys table, with normal buttons and forms for every action. The assistant sits in the panel on the right, and it can do everything you can do through the page itself, plus answer questions:
- Answer questions about the product from your documentation.
- List the workspace members and API keys.
- Invite and delete members, and create and delete API keys, asking the user to approve each change.
The settings-only design is deliberate: your product almost certainly has a page like this, and the assistant answers from your real documentation, so the two together are easy to imagine as your own app. Making it exactly that is how the tutorial ends.
See what it can do
With the app running, put the assistant through its paces. Each of these is a capability the second half of this tutorial takes apart.
Ask about the product
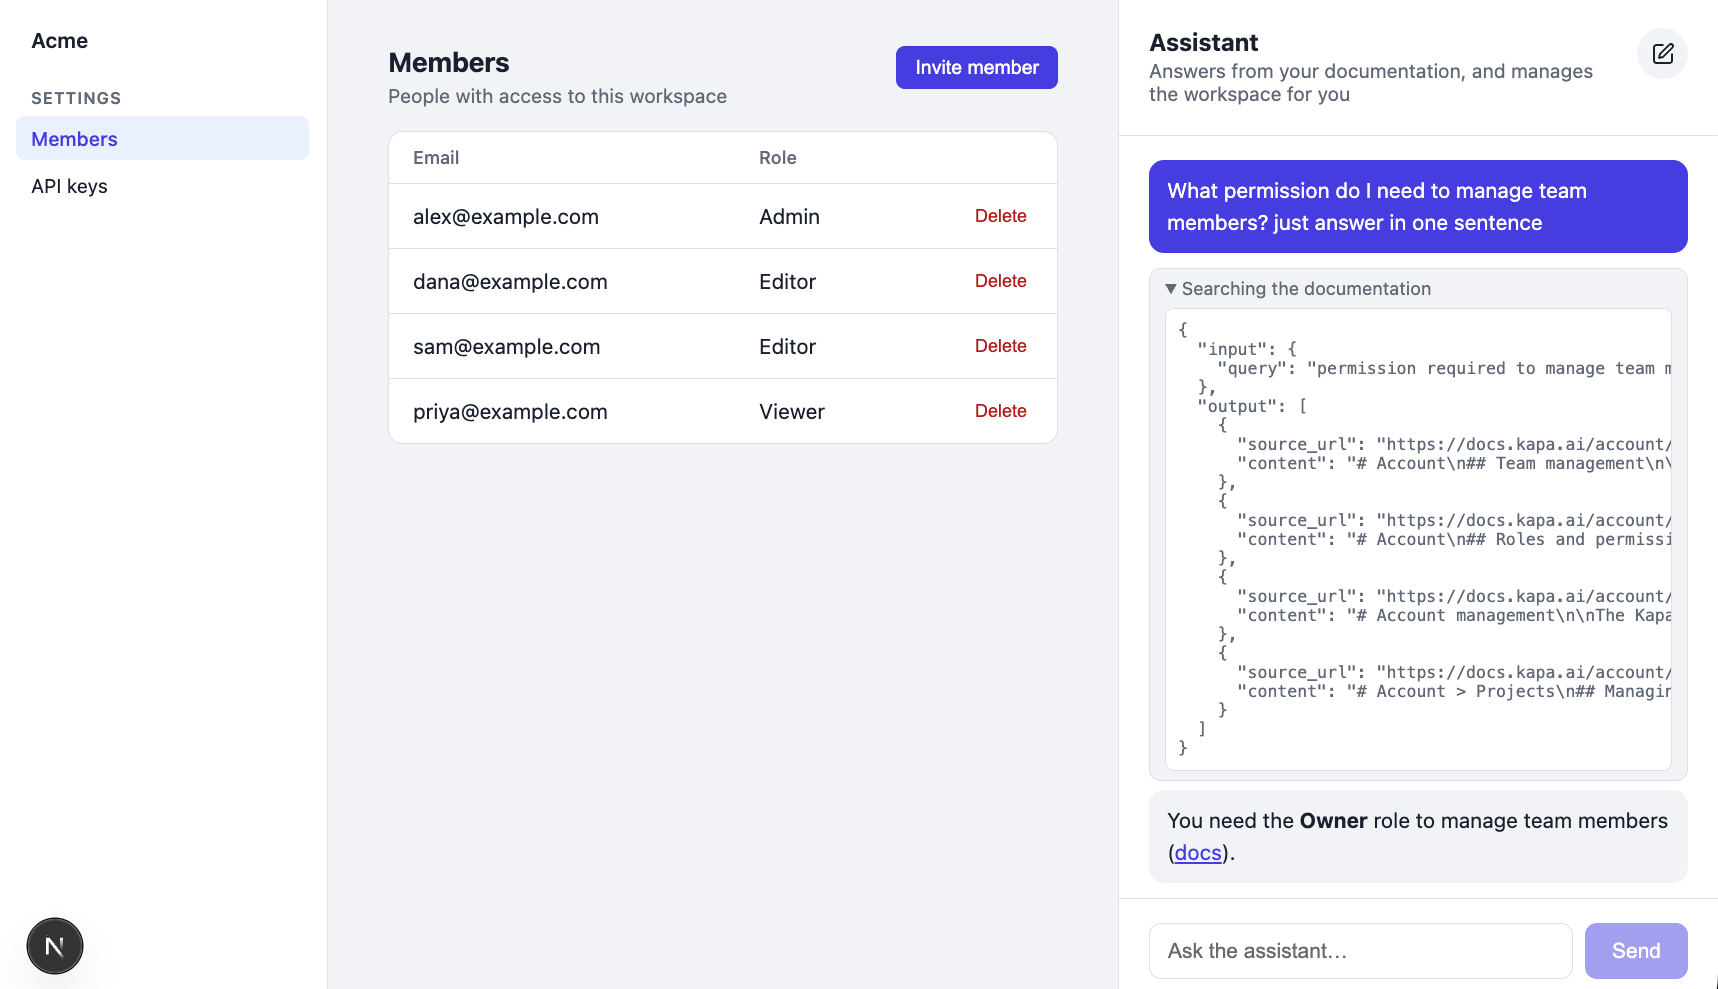
Ask a question your documentation answers. You can watch the agent work: it decides it needs your documentation, calls the Kapa search tool (the "Searching the documentation" step in the panel), and then writes its answer from what came back, citing the pages it used. Expand the step to see the exact query it sent and the chunks it received:
Make the assistant take an action
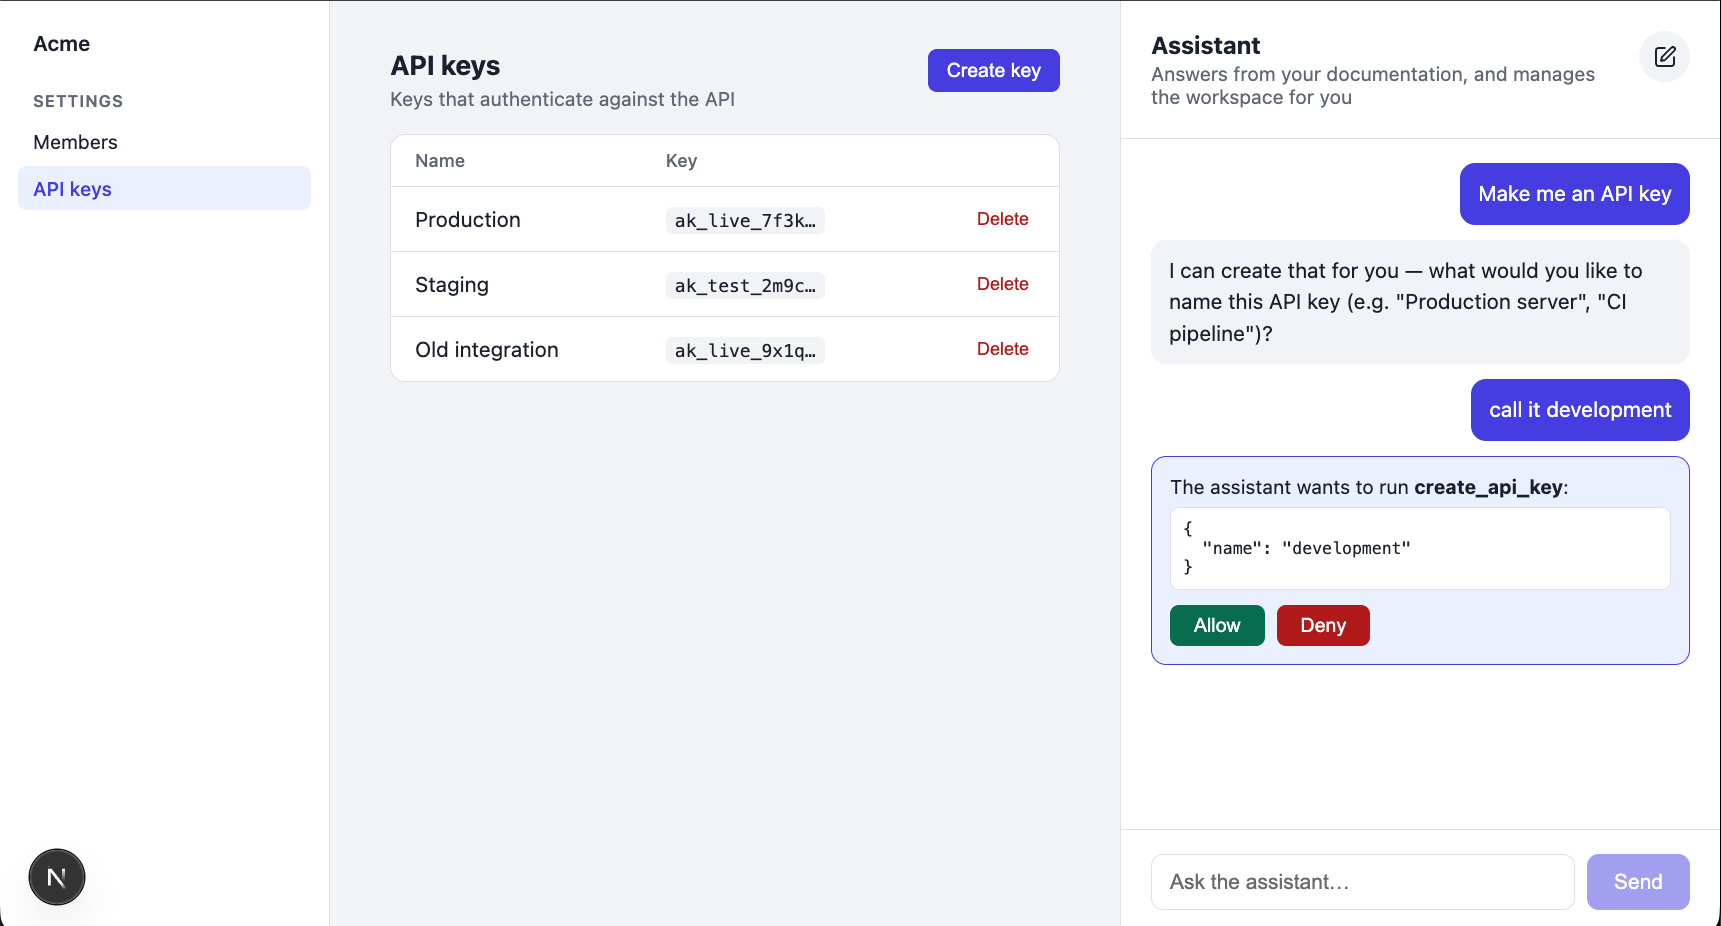
Ask: "Make me an API key." The assistant first asks what the key should be called. After you answer, it does not act right away: the panel shows an approval card with the exact tool call it wants to make, and waits for your decision.
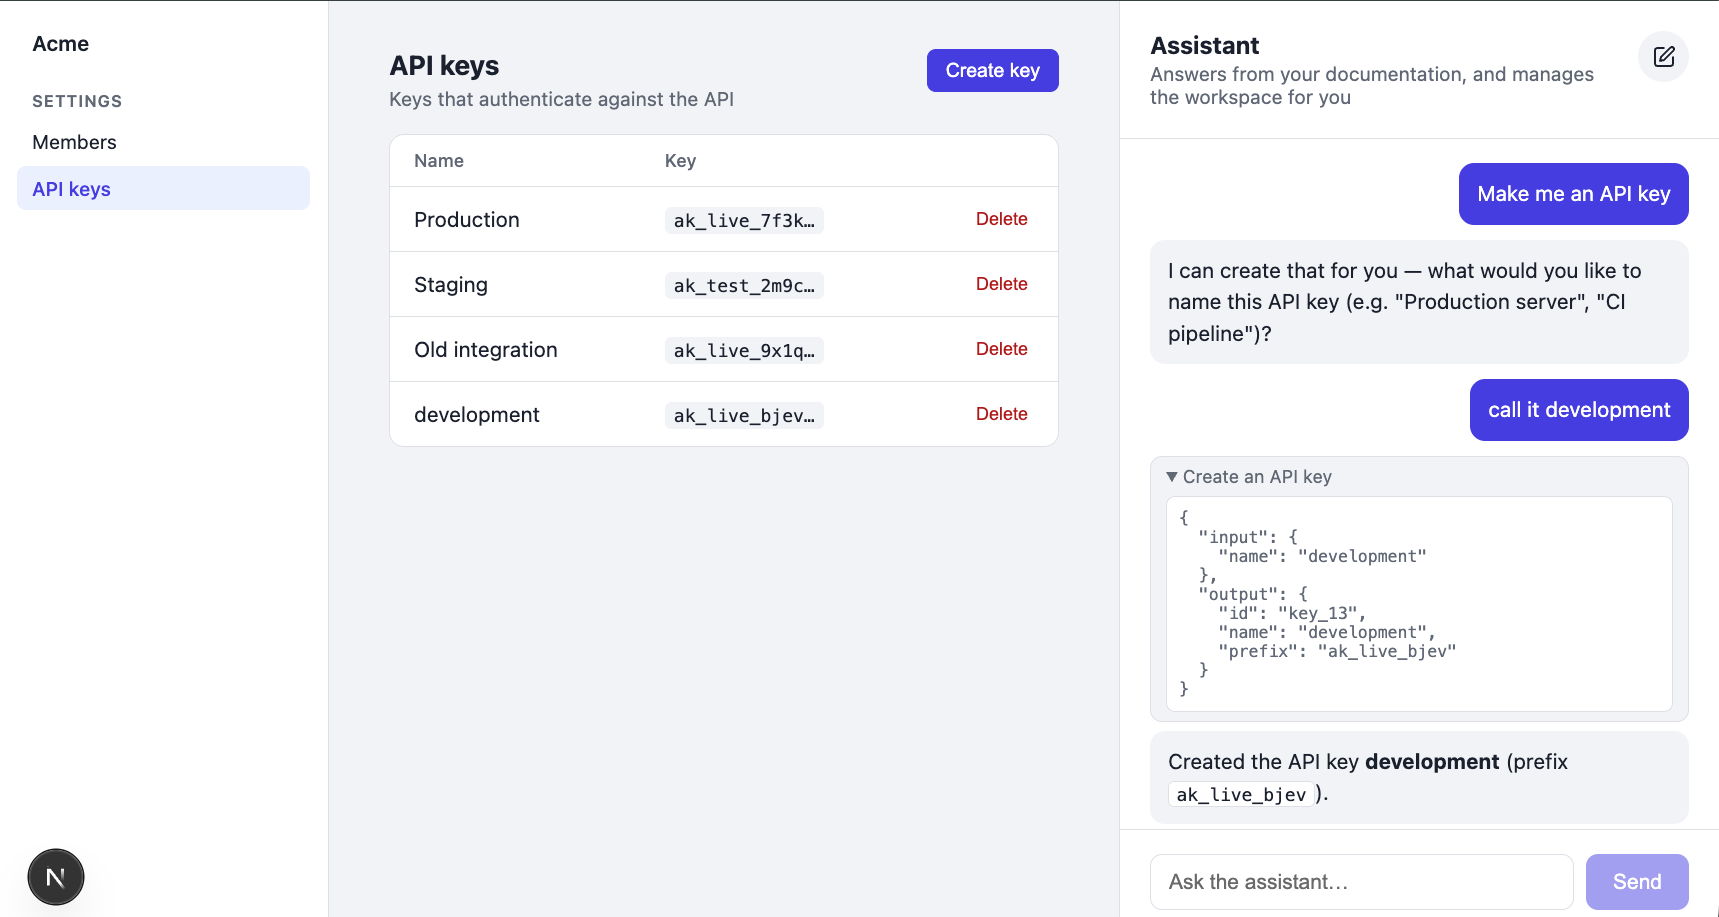
Click Allow and the tool executes: the new key appears in the table behind the panel, the tool card becomes an expandable record of the call, and the agent confirms in one sentence.
Inspect the code
Now to how it works. Everything lives in a handful of files:
app/
├── api/
│   ├── chat/
│   │   └── route.ts       # the chat endpoint: one call that serves the agent
│   └── settings/
│       └── route.ts       # backs the page's own buttons and forms
├── layout.tsx
├── page.tsx
└── globals.css
components/
├── Dashboard.tsx          # loads the workspace and lays out the page
├── SettingsView.tsx       # the members and API keys tables, with their controls
└── AssistantPanel.tsx     # the chat panel: messages and approval cards
lib/
├── agent.ts               # the agent: model, instructions, tools, approval policy
├── tools.ts               # what the agent can do: search, read, write
├── kapa.ts                # the Kapa retrieval call
└── store.ts               # in-memory demo data, standing in for your data layer
The architecture has three layers. Underneath sits a normal web app: a settings page with tables, forms, and an API route. On the server sits the agent: a model with instructions and a set of tools it calls in a loop. And in the browser, the chat panel runs the conversation between the user and that agent. The sections below walk through them in that order.
A normal app underneath
Strip away the assistant and this is a standard Next.js app. lib/store.ts holds the workspace data (standing in for your database), app/api/settings/route.ts exposes it to the page, and Dashboard.tsx with SettingsView.tsx render the tables and forms. Nothing in this layer knows AI exists.
The assistant comes on top of this and changes none of it. Its tools simply call the same lib/store.ts functions that the buttons on the page call, so the assistant and the UI operate on the same data.
The tools, on the server
Everything the assistant can do is a tool in lib/tools.ts. A tool is a schema plus a function: a description the model reads to decide when to call it, an inputSchema its arguments are validated against, and an execute function, which is ordinary server-side code. Here is the complete tool set:
lib/tools.ts, the complete tool set
export const tools = {
  // Knowledge: answers "what can the product do / how does X work" from your
  // documentation via Kapa retrieval. Runs server-side.
  search_acme_documentation: tool({
    description:
      "Perform semantic retrieval over the documentation and other knowledge sources of " +
      'Acme and return the most relevant chunks for a given query. A "chunk" is a short, ' +
      "self-contained snippet of text taken from a single page or item within these " +
      "sources (for example, part of a documentation page) and includes its source URL " +
      "and markdown content. The number of chunks varies with the query: the tool " +
      "returns the chunks it judged relevant. If the knowledge sources do " +
      "not contain information relevant to the query, the returned chunks may be only " +
      "weakly related or entirely unrelated. Use this tool anytime " +
      "you need information about Acme, including for your own understanding while " +
      "carrying out a task.",
    inputSchema: z.object({
      query: z
        .string()
        .describe("A single, well-formed natural-language query. Must be a complete sentence."),
    }),
    execute: async ({ query }) => searchKnowledgeBase(query),
  }),

  // Read tools: run immediately, no approval. They return IDs so the agent can
  // resolve the emails and key names users mention to real records.
  list_members: tool({
    description:
      "List all workspace members with their IDs, emails, and roles. Call this first to " +
      "resolve a member the user mentioned to a member ID before changing anything.",
    inputSchema: z.object({}),
    execute: async () => listMembers(),
  }),
  list_api_keys: tool({
    description:
      "List all API keys with their IDs, names, and prefixes. Call this first to resolve " +
      "a key name the user mentioned to a key ID.",
    inputSchema: z.object({}),
    execute: async () => listApiKeys(),
  }),

  // Write tools: gated behind user approval via toolApproval on the agent.
  invite_member: tool({
    description: "Invite a new member to the workspace by email, with a role.",
    inputSchema: z.object({
      email: z.string().describe("The email address to invite."),
      role: roleSchema.describe("The role the new member gets."),
    }),
    execute: async (input) => inviteMember(input),
  }),
  delete_member: tool({
    description: "Delete a member from the workspace.",
    inputSchema: z.object({
      memberId: z.string().describe("The member ID (from list_members)."),
    }),
    execute: async ({ memberId }) => deleteMember(memberId),
  }),
  create_api_key: tool({
    description: "Create a new API key.",
    inputSchema: z.object({
      name: z.string().describe("A short name describing what the key is for."),
    }),
    execute: async ({ name }) => createApiKey(name),
  }),
  delete_api_key: tool({
    description: "Delete an API key permanently. Deleted keys stop working immediately.",
    inputSchema: z.object({
      keyId: z.string().describe("The API key ID (from list_api_keys)."),
    }),
    execute: async ({ keyId }) => deleteApiKey(keyId),
  }),

} satisfies ToolSet;
Reading it top to bottom: the first tool, search_acme_documentation, is where Kapa plugs in. It calls Kapa's Retrieval endpoint, which returns the most relevant sections of your documentation for a query, ready for the agent to read:
const url = `https://api.kapa.ai/query/v1/projects/${projectId}/retrieval/`;

const response = await fetch(url, {
  method: "POST",
  headers: {
    "X-API-KEY": apiKey,
    "Content-Type": "application/json",
  },
  body: JSON.stringify({
    query,
    integration_id: integrationId,
    mode: "deep",
  }),
});
mode: "deep" selects Kapa's most capable retrieval mode, in terms of both recall and precision: a retriever agent searches and reads your documentation and returns what it judges relevant, which keeps the number of tokens Kapa contributes to your agent's context small. Choose a retrieval mode covers the modes and their latency. Note the tool's description too: beyond explaining what comes back, it tells the agent to search not only for user questions but for its own understanding while carrying out a task.
The rest of the file falls into two groups:
- Read tools (
list_members,list_api_keys): return the workspace records with their IDs. Users speak in emails and key names while the write tools require IDs, so the agent lists first, resolves the ID from the result, and then acts. Keep what these return small; everything lands in the model's context. - Write tools (
invite_member,delete_member,create_api_key,delete_api_key): call the same store functions as the page's buttons. Nothing here mentions approval; that policy lives on the agent, which comes next.
The agent
The tools come together in lib/agent.ts, where the AI SDK's ToolLoopAgent class bundles the whole configuration. This is the complete file:
import { anthropic } from "@ai-sdk/anthropic";
import { isStepCount, ToolLoopAgent, type InferAgentUIMessage } from "ai";
import { tools } from "./tools";

const INSTRUCTIONS = `You are the platform assistant for Acme, embedded in its web app and \
communicating with Acme's users through a chat interface. You help them in two ways: you \
answer questions about the product from its documentation, and you view and manage their \
workspace (members and API keys) on their behalf.

- Answer product questions from search_acme_documentation chunks, citing the source URLs \
you used. If the chunks do not contain enough information to answer, say so instead of \
guessing.
- Never guess an ID: if you have not seen it in a tool result in this conversation, look \
it up first, and only call the write tool in a later step, never alongside the lookup.
- Call write tools directly instead of asking for permission in chat; the application \
shows the user an approval prompt for every change. When an execution is denied, do not \
retry it; ask the user how to proceed.
- Answer in markdown, keep responses short, and do not repeat data the user can already \
see on the page.`;

export const assistant = new ToolLoopAgent({
  model: anthropic("claude-sonnet-5"), // swap for any AI SDK provider
  instructions: INSTRUCTIONS,
  tools,
  toolApproval: {
    invite_member: "user-approval",
    delete_member: "user-approval",
    create_api_key: "user-approval",
    delete_api_key: "user-approval",
  },
  stopWhen: isStepCount(10),
});

export type AssistantUIMessage = InferAgentUIMessage<typeof assistant>;
The configuration, top to bottom:
model: the model behind the agent. Swapping providers is this one line.instructions: the system prompt. It is deliberately minimal; more on it below.tools: the tool set from the previous section.toolApproval: marks the four write tools as requiring the user's decision. This is the entire approval policy; the tools themselves know nothing about it.stopWhen: caps the loop at ten steps.AssistantUIMessage: the exported message type, giving the client full type inference for the agent's tools.
When the agent runs, the AI SDK executes tools as the model calls them, feeds the results back, and triggers the next generation, repeating until the model produces a final answer or hits the step limit. That loop is what makes this an agent rather than a single model call: within one user turn, it can look something up, read the result, and act on what it found.
The instructions are minimal because most of the steering lives in the tool descriptions, which already say when to call each tool; what remains is there because the agent behaved worse without it. The never-guess-an-ID rule exists because the model sometimes issued the lookup and the write in the same step, guessing the ID before the lookup returned. The call-write-tools-directly clause exists because without it, the model asks "shall I proceed?" in chat before every write, double-confirming what the approval card is about to ask anyway. Expect to grow your instructions the same way, one observed misbehavior at a time; Best practices for building an in-product agent collects what we learned doing exactly that.
Serving all of this from Next.js is one route handler:
export async function POST(request: Request) {
  const { messages } = await request.json();

  return createAgentUIStreamResponse({
    agent: assistant,
    uiMessages: messages,
  });
}
createAgentUIStreamResponse validates the incoming conversation, runs the agent, and streams its output as typed message parts. This route is also why the agent and its tools are server-side: lib/agent.ts is just configuration until this handler runs it, and Next.js route handlers run on the server. Your API keys, the loop, and every tool's execute stay there; the browser only ever receives the stream.
The chat panel, in the browser
The panel in AssistantPanel.tsx is a hand-rolled chat UI on the useChat hook, which consumes the route's stream and manages the conversation:
const { messages, sendMessage, addToolApprovalResponse } =
  useChat<AssistantUIMessage>({
    transport: new DefaultChatTransport({ api: "/api/chat" }),
    sendAutomaticallyWhen: lastAssistantMessageIsCompleteWithApprovalResponses,
  });
The hook handles the chat mechanics: sending messages, consuming the stream, and holding the conversation state. Rendering the messages is up to you, in plain React.
A message is a list of parts: text, plus one tool part for every tool call. Each tool part has a state that moves forward as the call progresses: input-streaming while the model writes the arguments, approval-requested while a gated tool waits for the user, and finally output-available, output-denied, or output-error. To render a message, the panel loops over its parts and switches on that state: a status chip for running tools, an expandable record for finished ones, and for approval-requested, the card you clicked in the demo. The card has one job beyond looks: reporting your decision back.
case "approval-requested":
  return (
    <div key={part.toolCallId} className="approval">
      <p>The assistant wants to run <strong>{name}</strong>:</p>
      <pre>{JSON.stringify(part.input, null, 2)}</pre>
      <button
        onClick={() =>
          addToolApprovalResponse({ id: part.approval.id, approved: true })
        }
      >
        Allow
      </button>
      <button
        onClick={() =>
          addToolApprovalResponse({ id: part.approval.id, approved: false })
        }
      >
        Deny
      </button>
    </div>
  );
On Allow, the tool executes on the server and the part moves to output-available. On Deny, it ends in output-denied and the model is told the execution was refused; the instructions add "do not retry it, ask the user how to proceed" so a denial ends the attempt rather than looping.
sendAutomaticallyWhen ties the two sides together: the moment the browser supplies the approval decision the server was waiting for, the conversation resubmits automatically and the agent continues as if it never stopped. And because the full conversation lives in useChat state and is sent with every request, the chat is multi-turn: follow-ups can refer to anything said or found earlier.
Adapt it to your product
The demo is deliberately small so that every seam is visible. To turn it into your product's assistant:
- Swap the data layer. Replace
lib/store.tswith calls to your real services inside each tool'sexecutefunction. This is where the user's session matters: read the authenticated user in the route handler and pass it into the tools, so the agent can only ever see and change what that user can. - Design tools around user questions, not endpoints. Start from what your users actually ask, and give every workflow the read tools it needs to resolve names to IDs. A focused set of fast, reliable tools beats a wrapper around your whole API.
- Keep the approval split honest. Reads run free, writes ask first.
toolApprovalalso accepts a function per tool, so you can approve low-stakes changes automatically and reserve the prompt for destructive or high-impact ones. - Make the panel yours. The chat UI is hand-rolled precisely so it can inherit your design system; restyle it, or replace its internals with a component library, without touching the agent.
- Swap the model freely. The provider is one line; the tools, the approval flow, and the retrieval layer do not change.
The knowledge tool needs no adaptation at all: it already searches whatever your Kapa project indexes, and improving the answers is a matter of tuning retrieval size and prompting for grounded answers, not of touching the loop.
Summary
In this tutorial, you:
- Ran a Next.js app whose embedded assistant answers questions from your documentation and manages the workspace, asking for your approval before every change.
- Saw how the Vercel AI SDK carries it: a
ToolLoopAgentholding the model, instructions, tools, and approval policy, served from one route handler, rendered by auseChatpanel in the browser. - Connected Kapa retrieval as the agent's knowledge tool, attributed through an HTTP API integration.
- Learned the two habits of workspace tools: read tools resolve the names users mention to IDs, and write tools wait for approval.
Next steps
- Best practices for building an in-product agent: lessons from building and operating a thirty-tool production agent.
- Choose a retrieval mode: which mode to run, default or deep, and how much to let it return.
- Prompt your agent for grounded answers: sharpen citation and uncertainty behavior.
- Kapa Agent SDK: the prebuilt path to the same result, with the loop and chat UI included.