Deflect Zendesk Support Form Tickets with AI Answers
Integrate the Kapa Support Form Deflector into your Zendesk Guide Support Form to automatically suggest relevant answers before users submit tickets, helping reduce support volume and improve user experience.
Prerequisites
Before adding the deflector to your support form, you'll need:
- A Kapa account with access to the Support Form Deflector
- Admin access to your Zendesk Help Center
Installation Steps
-
Create Support Form Deflector Integration:
- Visit the
/Integrationstab on the Kapa platform - Create a new
Support Form Deflectorintegration - Enable your Zendesk domain in the format:
https://yoursubdomain.zendesk.com - Copy your Integration ID - you'll need this for the script configuration
- Visit the
-
Access Theme Editor:
- Log into your Zendesk Admin Center
- Navigate to Guide settings (under Channels)
- Click "Customize design"
- Select your theme and click "Edit code"
-
Modify New Request Page:
- In the theme editor, locate and open
new_request_page.hbs - Find the
<div id="main-content" class="form">section
- In the theme editor, locate and open
-
Add Script:
Add the following script tag just before
<div id="new-request-form"></div>noteThis example includes opinionated behavior and styling configuration that work well with Zendesk's default theme. If you've customized your form, you'll need to adjust the selectors to match your specific form elements. For a complete list of configuration options and detailed explanations of each parameter, see:
<script
  async
  src="https://widget.kapa.ai/kapa-support-form-deflector.bundle.js"
  data-integration-id="YOUR_INTEGRATION_ID"
  data-project-color="#YOUR_BRAND_COLOR"
  data-main-input-query-selector="textarea[name='request[description]']"
  data-extra-input-query-selectors="input[name='request[subject]']"
  data-extra-input-names="Subject"
  data-submit-element-query-selector="button[type=submit]"
  data-submit-element-event-type="onClick"
  data-submit-button-query-selector="button[type=submit]"
  data-anchor-element-query-selector="textarea[name='request[description]']"
  data-anchor-element-position="afterend"
  data-submit-button-text-query-selector="button[type=submit]"
  data-submit-button-text-override="Next Step"
  data-pre-submit-info-text="Our AI assistant will check if we can help you right away. If you still need assistance afterwards, you can submit a ticket to our support team."
  data-answer-box-padding-x="md"
  data-answer-box-padding-y="md"
  data-answer-box-background-color="transparent"
  data-answer-box-border="1px solid #DBE0E1"
></script> -
Save & Preview:
- Click "Save" to store your changes
- Preview the changes using Zendesk's preview functionality
- Test the form by entering a sample ticket
-
Publish:
- Once satisfied with the preview, click "Publish changes"
- The deflector will now be live on your support form
Verification
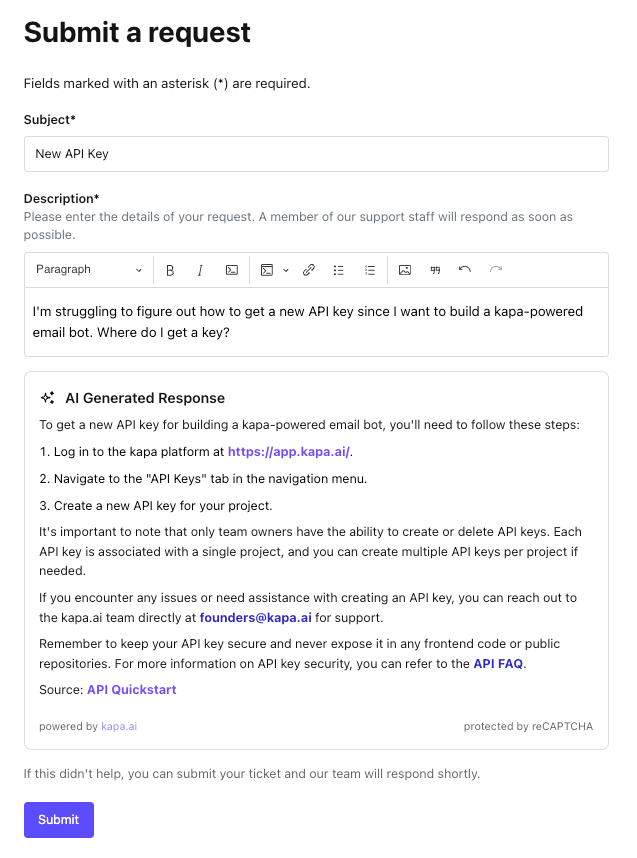
To verify the installation:
- Navigate to your help center's submit request page
- Enter a test subject and description
- The deflector should activate and show relevant answers before allowing submission
Make sure to test with different types of queries to ensure the deflector is working as expected across various support scenarios.
Troubleshooting
If the deflector isn't appearing:
- Confirm your integration ID is correct
- Check that your domain is enabled in Kapa's settings
- Verify the script is properly placed in the template
- Ensure the CSS selectors match your Zendesk form elements
Need help? Contact the Kapa team.