Manage sources
This guide covers the essential concepts and workflows for source management in the Kapa platform.
Data sources in Kapa serve as the foundation of your AI assistant's knowledge base. Proper source management ensures your assistant has access to the most current and relevant information while maintaining security and organization.
Who can create sources
Source creation permissions depend on your role and project-specific access:
- Owners: Can create and manage sources for all projects
- Members with "Edit project sources" permission: Can create and manage sources for specific projects they have access to
- Members without source permissions: Can view sources but cannot create or modify them
- Users: Cannot access the Kapa platform directly and cannot manage sources
For detailed information about roles and permissions, see Roles and permissions.
How to edit sources
You can edit a source's configuration directly from the Kapa platform. Open the source from the sources list, update the relevant fields, and save.
Saving an edit triggers a full re-fetch of the source under the new configuration. The source stays available throughout: items are replaced one by one as the new content is fetched, rather than the source going offline. Editing in production is safe, though answers may cite a mix of old and new items until the re-fetch finishes.
Source groups
Source groups solve quality issues that arise when Kapa indexes multiple versions of documentation for the same product or multiple similar products. Without source groups, you may experience:
- Mixed citations: Kapa might cite a different version than the one the user asked about
- Reduced answer quality: Retrieval gets cluttered by similar chunks from different versions, reducing the diversity and relevance of answers
Source groups allow you to organize your data sources and deploy AI assistants with access to specific subsets of sources, ensuring users receive targeted, relevant answers.
What are source groups
Source groups are labels that you can assign to one or more data sources to categorize them logically. You can configure an integration to only access sources from specific groups. This is done by setting a configuration parameter which limits the assistant's knowledge base to the relevant sources for that particular integration.
Source groups organize sources within a project. To understand when to use source groups versus creating separate projects, see Projects vs. source groups.
This filtering capability allows you to:
- Deploy specialized versions of your assistant for different products or audiences
- Ensure users only receive information from relevant sources
- Maintain a single Kapa project while serving different use cases
Source groups are designed to let you organize sources by products (when you have documentation for multiple products) or by versions (when you need to maintain documentation for different software versions).
Hierarchical source groups
Source groups can be organized in a two-level hierarchy, allowing you to create parent groups with child subgroups. Sources assigned to a parent group are automatically inherited by all its child groups.
For example, you can structure your groups like this:
- Product A
- Version 1
- Version 2
- Product B
- Sub-product X
- Sub-product Z
In this structure:
- Sources assigned to "Product A" are available to both "Version 1" and "Version 2" subgroups
- Sources assigned specifically to "Version 1" are only available to that subgroup
- Each subgroup has access to both its parent's sources and its own sources
Global sources
There's a special "Global" group that exists by default. Sources assigned to the Global group are automatically inherited by all other source groups in your project. This is useful for common resources like:
- General company documentation
- API reference that applies to all products
- Common troubleshooting guides
Example hierarchy with global sources:
Global (inherited by all groups)
Product A
├── Version 1
└── Version 2
Product B
├── Sub-product X
└── Sub-product Z
In this setup, sources in the Global group are available to all products and their subgroups, while maintaining product-specific separation.
Example: How source group filtering works
Consider this setup with seven sources organized in a hierarchy matching the structure from the previous section:
| Source | Description | Assigned group | Group ID |
|---|---|---|---|
| Source A | General API docs | Global | a1b2c3d4-e5f6 |
| Source B | Product A overview | Product A (parent) | b2c3d4e5-f6a7 |
| Source C | v1.0 release notes | Product A > Version 1 | c3d4e5f6-a7b8 |
| Source D | v1.0 API reference | Product A > Version 1 | c3d4e5f6-a7b8 |
| Source E | v2.0 release notes | Product A > Version 2 | d4e5f6a7-b8c9 |
| Source F | v2.0 migration guide | Product A > Version 2 | d4e5f6a7-b8c9 |
| Source G | Product B docs | Product B | e5f6a7b8-c9d0 |
When you configure an integration with sourceGroupIDsInclude: ["c3d4e5f6-a7b8"]
(Product A > Version 1):
| Source | Available? | Reason |
|---|---|---|
| Source A | ✅ Yes | From Global group (inherited by all groups) |
| Source B | ✅ Yes | From Product A parent group (inherited by Version 1) |
| Source C | ✅ Yes | Specifically assigned to Version 1 subgroup |
| Source D | ✅ Yes | Specifically assigned to Version 1 subgroup |
| Source E | ❌ No | Only assigned to Version 2 subgroup |
| Source F | ❌ No | Only assigned to Version 2 subgroup |
| Source G | ❌ No | Only assigned to Product B (different product) |
Result: The integration can access four out of seven sources. It includes global sources, parent group sources, and Version 1-specific sources, while excluding Version 2-specific documentation and Product B documentation.
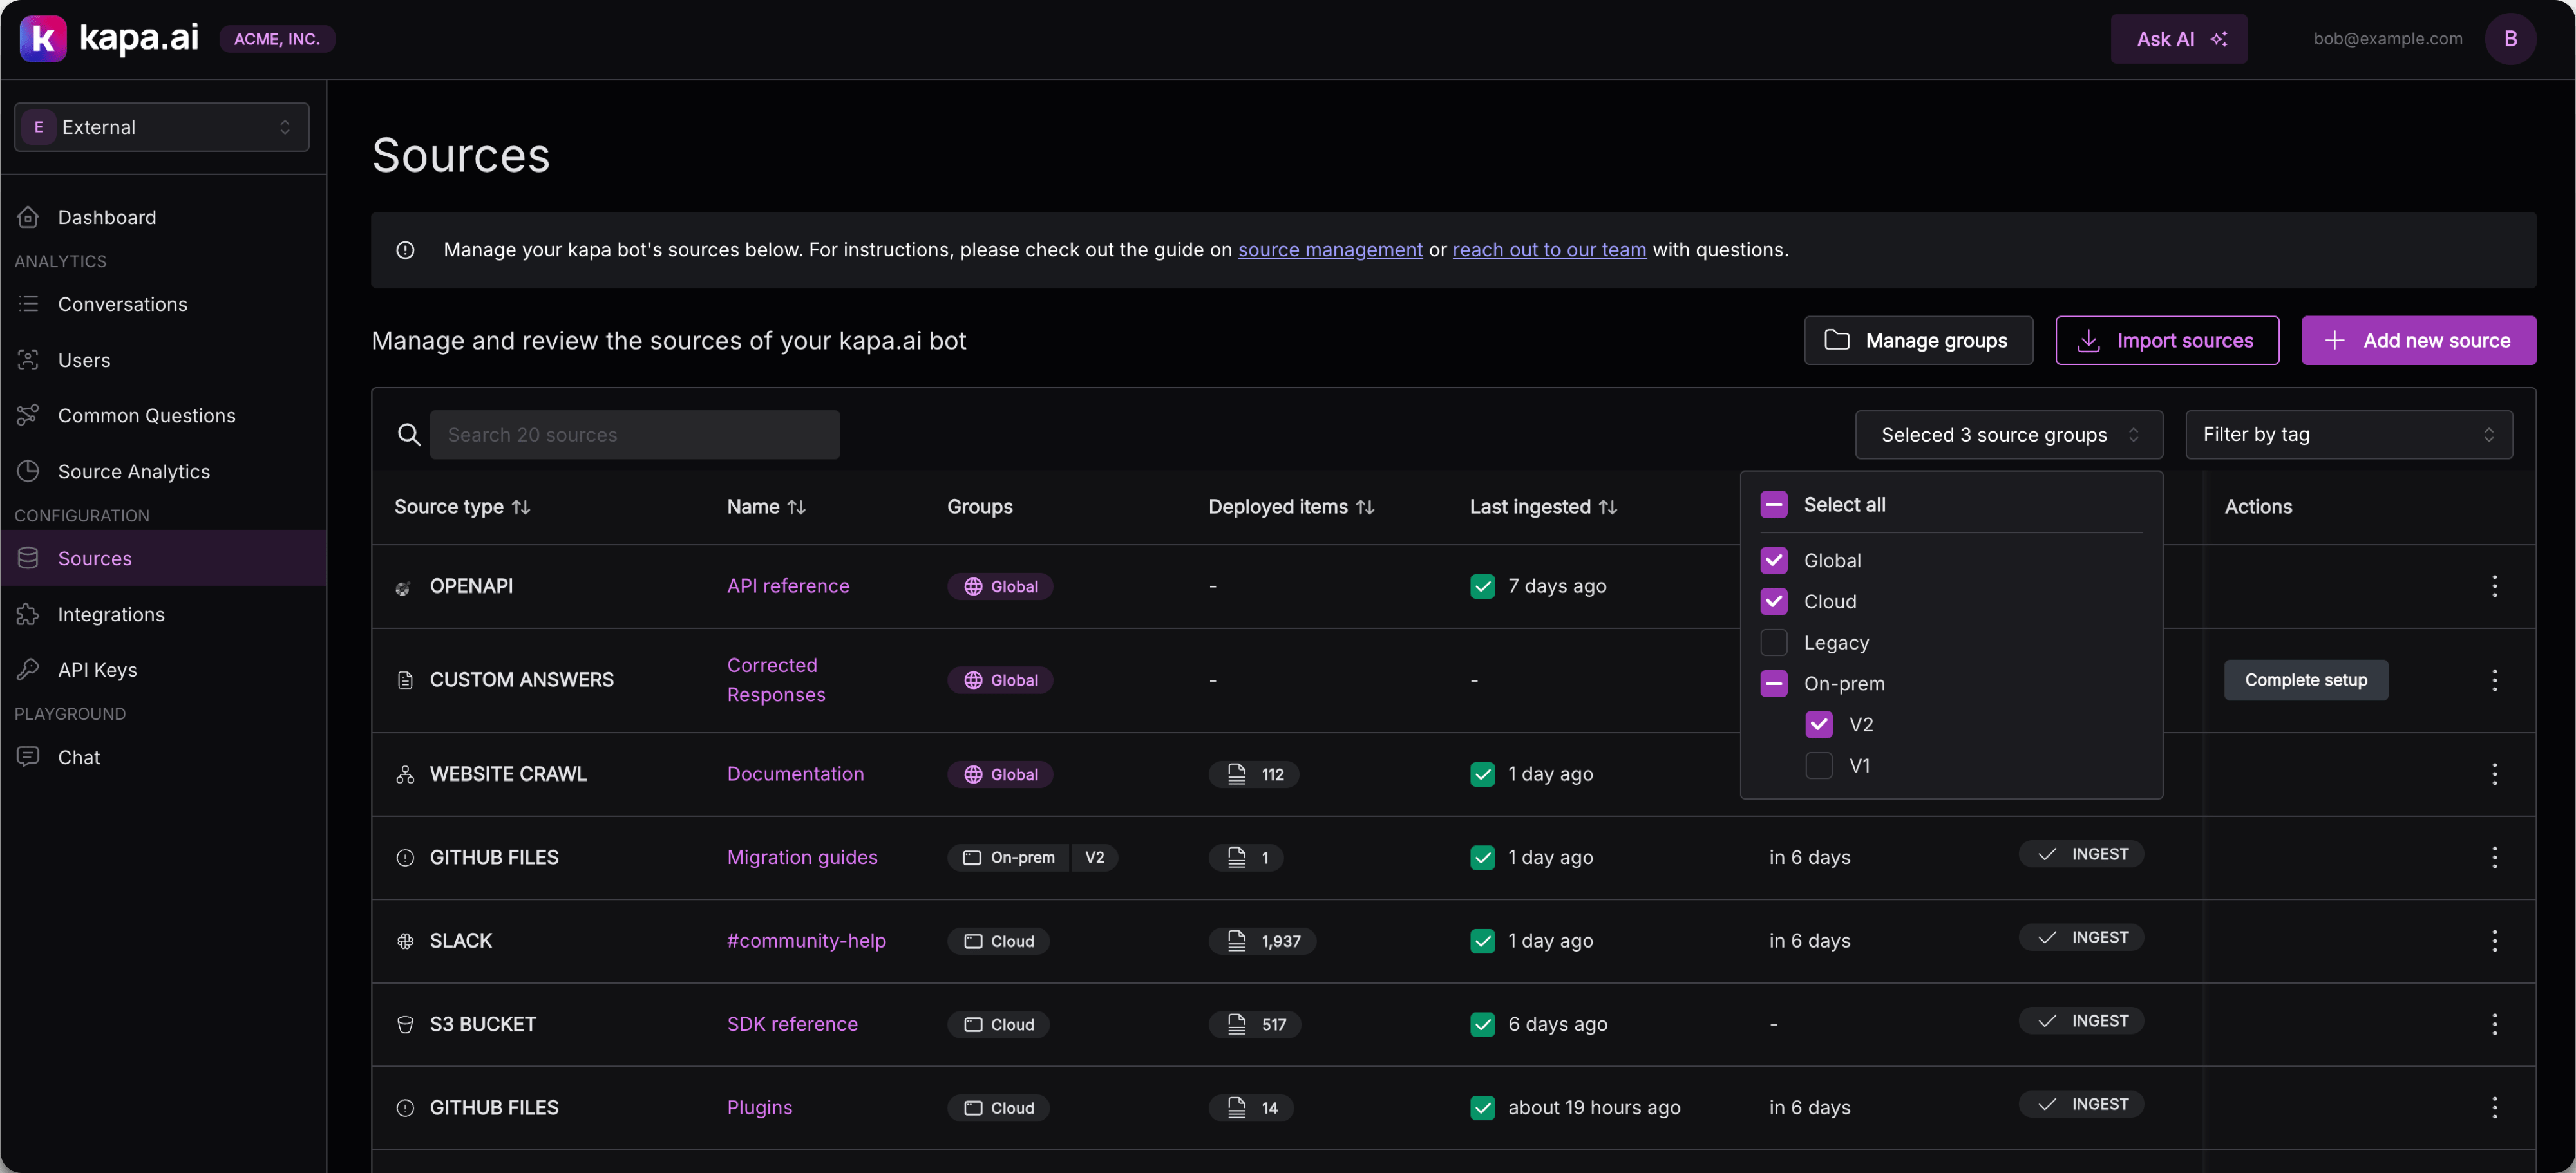
Creating and managing source groups
To manage source groups:
- Navigate to the Sources view in your Kapa project
- Click the Manage groups button
- From the source groups management page, you can:
- Create new parent groups or subgroups
- Edit existing group names and hierarchies
- Delete groups that are no longer needed
- Copy group IDs for use in your integrations
When creating groups, consider your product structure and how users interact with different parts of your documentation.
Assigning sources to groups
To assign a source to one or more groups:
- Navigate to the Sources view in your project
- Find the source you want to assign to a group
- Click Configure on the source
- In the configuration modal, select which groups to assign this source to
- Save your changes
You can assign a source to multiple groups if needed, allowing flexible organization of your content.
Configuring source groups in integrations
Once you've organized your sources into groups, you can configure your Kapa integrations to use specific groups. This ensures that queries are answered only using sources from the specified groups (plus any global sources).
This configuration respects group hierarchies. If you specify a subgroup, it also includes sources from the parent group, and vice versa. This is useful for deploying widgets in different configurations on different sites or sub-sites, configured for different source groups to make answers more targeted. For example, you could have one website pinned to "Version 24" and another to "Version 25".
Website widget configuration
For the website widget, add the data-source-group-ids-include attribute to
your script tag with a comma-separated list of group IDs:
<script
  async
  src="https://widget.kapa.ai/kapa-widget.bundle.js"
  data-website-id="your-website-id"
  data-project-name="Your Project"
  data-project-color="#6306B6"
  data-project-logo="your-logo.png"
  data-source-group-ids-include="group-id-1,group-id-2"
></script>
Example: Different widgets for different documentation versions
You might deploy different widget configurations on different documentation sites:
<!-- On docs.example.com/v24/ -->
<script
  async
  src="https://widget.kapa.ai/kapa-widget.bundle.js"
  data-website-id="your-website-id"
  data-project-name="Example v24"
  data-source-group-ids-include="b2c3d4e5-f6a7"
></script>

<!-- On docs.example.com/v25/ -->
<script
  async
  src="https://widget.kapa.ai/kapa-widget.bundle.js"
  data-website-id="your-website-id"
  data-project-name="Example v25"
  data-source-group-ids-include="c3d4e5f6-a7b8"
></script>
Example: Dynamic configuration based on URL
You can dynamically configure the widget based on the current URL path:
<script>
  // Determine which source groups to use based on URL
  function getSourceGroups() {
    const path = window.location.pathname;

    if (path.includes("/v24/")) {
      return "b2c3d4e5-f6a7"; // Version 24 group
    } else if (path.includes("/v25/")) {
      return "c3d4e5f6-a7b8"; // Version 25 group
    } else if (path.includes("/enterprise/")) {
      return "d4e5f6a7-b8c9,e5f6a7b8-c9d0"; // Enterprise + Advanced groups
    }

    return ""; // Default: all available sources
  }

  // Create and append the widget script
  const script = document.createElement("script");
  script.async = true;
  script.src = "https://widget.kapa.ai/kapa-widget.bundle.js";
  script.dataset.websiteId = "your-website-id";
  script.dataset.projectName = "Your Project";
  script.dataset.projectColor = "#6306B6";
  script.dataset.projectLogo = "your-logo.png";

  const sourceGroups = getSourceGroups();
  if (sourceGroups) {
    script.dataset.sourceGroupIdsInclude = sourceGroups;
  }

  document.head.appendChild(script);
</script>
React SDK
For the React SDK, set the sourceGroupIDsInclude option on the
KapaProvider component:
import { KapaProvider } from "@kapaai/react-sdk";

<KapaProvider
  integrationId="your-integration-id"
  sourceGroupIDsInclude={["group-id-1", "group-id-2"]}
>
  <YourApplication />
</KapaProvider>;
Agent SDK
For the Agent SDK, pass sourceGroupIdsInclude to the
Agent constructor (core) or AgentProvider (React). The agent's built-in
search_knowledge_base tool is then restricted to the specified groups.
import { AgentProvider } from "@kapaai/agent-react";

<AgentProvider
  projectId="your-project-id"
  integrationId="your-integration-id"
  model="kapa-agent-1.0"
  getSessionToken={getSessionToken}
  sourceGroupIdsInclude={["group-id-1", "group-id-2"]}
>
  <YourApplication />
</AgentProvider>;
See Agent core options and
AgentProvider props for full details.
Hosted MCP server configuration
For the hosted MCP server, configure source groups during setup:
- In Kapa, go to Integrations and select your hosted MCP server.
- Under Source groups, select one or more groups to restrict the server to.
- Save the configuration.
Once configured, the MCP server only returns results from sources in the specified groups (plus any global sources). Clients connecting to the server cannot access sources outside these groups.
If you also use the source_group_ids_include parameter in the
_meta field
(available for API key authenticated servers), the server takes the
intersection of the two lists. This lets clients narrow results further within
the server's allowed groups, but never broaden beyond them.
For more details, see the Hosted MCP server documentation.
HTTP API
If you call the Kapa HTTP API directly, pass
source_group_ids_include as an array of group UUIDs in the request body. It
is supported across the chat and
retrieval endpoints.
{
  "query": "How do I get started?",
  "source_group_ids_include": ["c3d4e5f6-a7b8-4c8a-9d1e-2f3a4b5c6d7e"]
}
When set, only sources in the specified groups (plus any global sources) are used for the request.
Integrations without source group support
Source group filtering is not currently available on the following integrations:
- Slack Bot
- Discord Bot
- Zendesk Agent
- Internal Technical Assistant (uses per-source filtering via a dropdown in the chat interface instead)
- Support Form Deflector
If you need source group filtering on one of these, reach out to support@kapa.ai.
Finding group IDs
To find the ID of a source group:
- Go to the Sources view in your project
- Click Manage groups
- Find your group in the list
- Copy the group ID to use in your configuration
The group ID is a unique identifier that remains constant even if you rename the group.
Best practices for source groups
When organizing sources with groups:
- Create groups that align with how you'll filter content for different widget deployments
- Start simple: Begin with a few broad groups and refine as needed
- Most organizations use groups to separate products or versions
[!TIP] Only use source groups if you need to. Kapa can usually handle product differentiation well without the need to define source groups. Only use source groups if you see clear patterns in conversations that Kapa is misunderstanding which product or version that the user is talking about.
Troubleshooting
Lost source after deletion
- Deleted sources cannot be recovered
- Always verify the new source is working before deleting the original
- Consider keeping both sources temporarily during testing
Source group changes affecting integrations
Modifying source group assignments can break existing integrations:
- Deleting a referenced group: If you delete a group that's referenced in an integration configuration, that integration stops working
- Reassigning sources between groups: Changes to source assignments are reflected immediately on all existing integrations using those groups
- Moving sources out of groups: If you move a source from one group that's referenced in an integration to another group, that integration may no longer have access to content in that source
Before making changes to source groups:
- Review which integrations reference the groups you plan to modify
- Update integration configurations if needed
- Test affected integrations after making changes
Getting help
If you encounter issues with source management:
- Check the specific data source documentation for troubleshooting steps
- Review your permissions if you cannot perform certain actions
- Contact support@kapa.ai for complex source configuration issues