Team management
This guide explains how to manage team members in your Kapa account, including adding new users, assigning roles, and removing users.
Managing your team
Use the team page on the Kapa platform to manage all users in your Kapa team. To access the team page:
- Open the Kapa platform
- Click your user avatar to open the profile menu.
- Select Team Members from the dropdown.
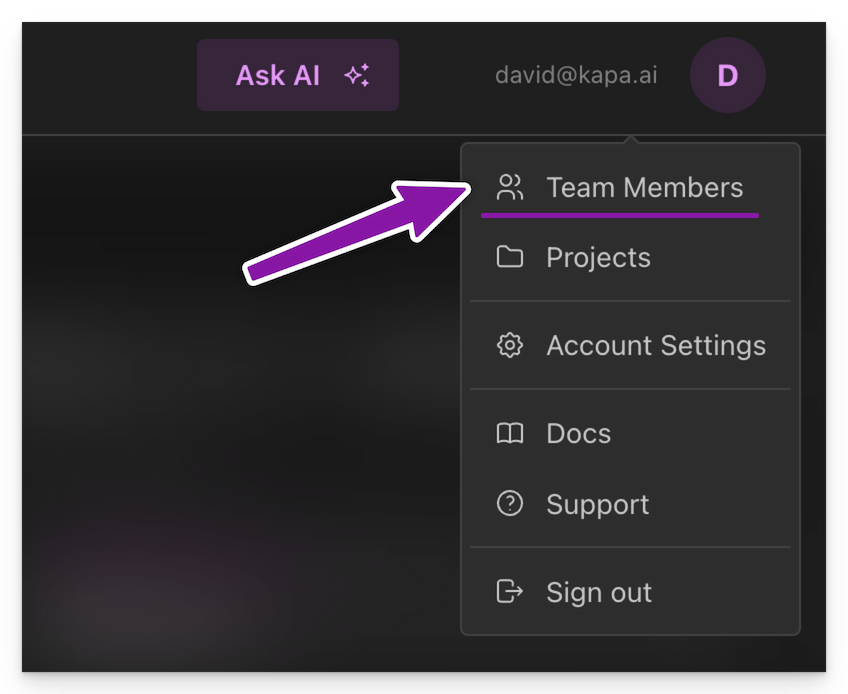
Only users with the Owner role can manage team members.
Add a new user
- Go to the team page on the Kapa platform
- Click the Invite button to open the new user dialog
- Enter the email address of the user you want to add
- Click Send invite to invite the user
The system sends an email invitation to the specified address. The user must accept the invite by following the link in the email to join your Kapa team.
If SCIM provisioning is enabled for your team, email invitations are disabled. Users must be provisioned through your identity provider.
New users are created without access to your projects. You must manually assign the relevant project permissions. For more information about projects, see Projects.
Automatic user provisioning
It's possible to configure your authentication mechanism to enable automatic user provisioning for your Kapa team. When enabled, Kapa accounts are automatically provisioned for users who sign in using email addresses associated with your team domain.
Automatically provisioned users are granted access to the Internal Technical Assistant only.
If you need to add a verified team domain, reach out to the Kapa team.
OAuth
To manage automatic user self-signup and provisioning for OAuth:
- Open the Kapa platform
- Click your user avatar to open the profile menu.
- Navigate to Settings from the dropdown.
- Click on Authentication in the side menu.
- Enable self-signup in the OAuth section.
Only users with the Owner role can manage authentication settings.
SAML (SSO)
Automatic user self-signup and provisioning is automatically enabled for teams who have configured SAML.
SCIM
For organizations that require centralized user lifecycle management, SCIM provisioning enables automatic user creation and deactivation through your identity provider. See SCIM provisioning for details.
Change user roles
To change a user's role within the team:
- Go to the team page on the Kapa platform
- Locate the user in the list
- Click the Manage Access button.
- Use the role dropdown to select either Owner or Member
Note that changing roles affects global team permissions but not project-specific permissions. See role-based permissions for more details.
Delete a user
To remove a user from your team:
- Go to the team page on the Kapa platform
- Locate the user in the list
- Click the Delete button
- Confirm the deletion when prompted
When you delete a user, they immediately lose access to all projects in your team.
If SCIM provisioning is enabled for your team, users must be deprovisioned through your identity provider and cannot be deleted manually.